Connect Workday to your Teamwork Graph
Workday is a cloud-based enterprise software platform that provides solutions for human resources (HR), payroll, finance, and workforce management.
Teamwork Graph unifies and connects data about teams, projects, goals, and third-party apps across your Atlassian ecosystem.
The graph establishes a unified data model that acts as a foundational layer for platform experiences like Rovo, search, agents, analytics, and automation.
Installing the Teamwork Graph connector for Workday specifically gives Talent (part of the Strategy Collection) information to streamline HR processes. It also enhances the employee data available via our out-of-the-box platform app, Teams, improving operational efficiency.
The nature of teamwork graph may subsequently improve employee-related search results by surfacing Workday information to Rovo. However the connection will not, in turn, make Workday searchable in the unified search bar.
What data is imported?
The Workday connector imports and stores these objects:
Organizations
Positions
Workers
The metadata and attributes ingested is detailed in the reports generated below.
Before you begin
To connect to Workday, many of the following steps must be completed by a Workday Admin. You will also need an Atlassian Organization admin to finish the setup.
Data from this connector will be used by multiple apps like Talent and Teams. To understand permissions and data use, read the Teamwork Graph data, privacy, and usage guidelines.
Some fields you need to configure are specific to the app you’re using this connector for, like Talent.
Overview of Workday setup
In Workday, you’ll need to setup an Integration System User (ISU), and three different reports to sync your organization data. The steps required to complete this are:
Create an ISU and security group
Set up Organizations report
Set up Positions report
Set up Workers report
Copy report URLs
This page will guide you through all the steps, which may take up to one hour to configure.
Create an Integration System User (ISU) and security group
You’ll need Workday Security Admin access to complete these steps.
In the Search Bar, search for
create integration system userand select the Create Integration System User Task.On the user create screen, fill in the fields:
User Name: Can be whatever.
Generate Random Password: Unchecked
New password and New Password Verify: Can be whatever.
Require New Password at Next Sign In: Unchecked
Session Timeout Minutes: 0
Do Not Allow UI Sessions: Checked
Select OK, and then select Done on the next screen.
From the Search bar, search for
create security groupand select the Create Security Group Task.From the dropdown that appears, select:
Type of Tenanted Security Group: Integration System Security Group (unconstrained)
Name: Can be whatever, but something like
Atlassian Integration group
Select OK. On the following screen, add your newly created user to the Integration System Users field, and select OK. Select Done.
From the Search bar, search for
view security groups for userand select the View Security Groups for User Report.In the Person field, search for the user you created above. Select OK.
In the displayed table, hover over the row with the newly created group, and next to the group name, select the three dots icon > Security Group > Maintain Domain Permissions for Security Group:
On the following form, add these Integration Permissions:
For Domain Security Policies permitting View access:
Indexed Data Source: Workers
Manage: Supervisory Organization
Organization: Supervisory Organization
Person Data: Work Contact Information
Staffing Actions: Business Title
Worker Data: Active Employees
Worker Data: All Positions
Worker Data: Business Title on Worker Profile
Worker Data: Current Job Profile Information
Worker Data: Current Staffing Information
Worker Data: Historical Staffing Information
Worker Data: Job Details
Worker Data: Organization Information
Worker Data: Public Worker Reports
Worker Data: Service Dates
Worker Data: Staffing
Worker Data: System ID
Worker Data: Time in Position
Worker Data: Worker ID
Worker Data: Workers
Worker Position: View
You’ll have some alerts warning that you need to update security policy changes. These will be handled in the next step. Select OK, and then select Done.
From the top Search bar, search for
activate pending security policy changesand select the Activate Pending Security Policy Changes Task.On the next screen, you need to add a comment about the changes you’ve made. Note down something like
Changing security policy for Atlassian integrationand select OK.To confirm the policy changes, tick the Confirm tickbox and select OK.
Your ISU password will need to be reset in 180 days.
To avoid your new ISU’s password needing to be reset in 180 days, we recommend exempting the new user by:
In the Search Bar, search for
Maintain password rulesand select the Maintain password rules Task.In the last field in the form, System Users exempt from password expiration, add your integration system user and select OK.
Select Done on the next page.
Organizations Report
In the Search Bar, search for
create custom reportand select the Create Custom Report Task.On the new report, fill in the fields:
Report Name: Can be whatever, but something unique like
Atlassian organizations reportReport Type: Set to Advanced
Temporary Report: Unchecked
Enable as a web service: Checked
Optimized for Performance: Unchecked
Data Source: Search and select
Supervisory Organizations
When you uncheck Optimized for Performance you’ll see an alert that you can ignore. Select OK.
You’ll be taken to a screen where you can add Additional Info. In the Columns tab, add all of the following fields. After adding each, you’ll need to select the plus icon at the beginning of the row to add a new row in the table.
Business Object | Field | Column Heading Override | Column Heading Override XML Alias |
|---|---|---|---|
Supervisory Organization | Supervisory Organization |
| organizationName |
Supervisory Organization | Is Organization Active or Has Active Descendants |
| isActive |
Supervisory Organization | Inactive Date |
| inactiveDate |
Supervisory Organization | Workday ID |
| organizationId |
Supervisory Organization | Created Moment |
| createdAt |
Supervisory Organization | Last Functionally Updated |
| lastUpdated |
Superior Organization | Workday ID |
| superiorOrganizationId |
When you add the Superior Organization row, Workday will show an Alert. This can safely be ignored.
4. In the same location, add one of the following:
Add the Position(s) Assigned to Manager object if you are assigning a position for the manager role on every supervisory organization.
Add the Supervisory Manager(s) object if you are allowing inherited roles for supervisory organizations without an assigned manager position.
Business Object | Field | Column Heading Override | Column Heading Override XML Alias |
|---|---|---|---|
Position(s) Assigned to Manager | Workday ID |
| managerPosition |
Supervisory Manager(s) | Create a Lookup Related Value of the manager's position Workday ID |
| managerPosition |
5. Scroll down to Group Column Headings and add the following Business Object.
Business Object | Group Column Heading | Column Heading Override XML Alias |
|---|---|---|
Superior Organization |
| superiorOrganization |
6. In the same location, add one of the following. This will be the same object selected in step 4.
Add the Position(s) Assigned to Manager object if you are assigning a position for the manager role on every supervisory organization.
Add the Supervisory Manager(s) object if you are allowing inherited roles for supervisory organizations without an assigned manager position.
Business Object | Group Column Heading | Column Heading Override XML Alias |
|---|---|---|
Position(s) Assigned to Manager |
| positionsAssignedToManager |
Supervisory Manager(s) |
| positionsAssignedToManager |
7. Confirm your data looks like this:
8. Select the Share tab.
9. For Report Definition Sharing Options, select Share with specific authorized groups and users
10. For Authorized Groups, add the security group you created above. For Authorized Users, add the ISU account you created.
11. Select OK to save the report.
Positions Report
In the Search Bar, once again search for
create custom reportand select the Create Custom Report Task.On the new report, fill in the fields:
Report Name: Can be whatever, but something unique like
Atlassian position reportReport Type: Set to Advanced
Temporary Report: Unchecked
Enable as a web service: Checked
Optimized for Performance: Unchecked
Data Source: Search and select
All Positions Including Closed Positions
When you uncheck Optimized for Performance you’ll see an alert that you can ignore. Select OK.
You’ll be taken to a screen where you can add Additional Info. In the Columns tab, add the following fields. After adding each, you’ll need to select the plus icon at the beginning of the row to add a new row in the table.
*Fields marked with an ( * ) are specific to Talent use only.
Business Object | Workday Field | Column Heading Override | Column Heading Override XML Alias |
|---|---|---|---|
Position - Position Management | Position Title |
| businessTitle |
Position - Position Management | Position Vacated Date - Closed Positions |
| positionClosedDate |
Position - Position Management | Last Functionally Updated |
| lastUpdated |
Supervisory Organization | Workday ID |
| supervisoryOrganizationId |
Worker | Workday ID |
| workerId |
Position and Job - All Staffing Models | Workday ID |
| positionId |
Position and Job - All Staffing Models | Job Description |
| positionDescription |
Position and Job - All Staffing Models | Created Moment |
| createdAt |
Position and Job - All Staffing Models | Staffing Status Filled |
| isFilled |
Position and Job - All Staffing Models | Staffing Status |
| staffingStatus |
Position - Position Management* | Hiring Restrictions - Worker Type |
| employmentType |
Position - Position Management* | Job Family |
| jobFamily |
Location* | Time Zone |
| timezone |
Location* | Country |
| country |
Job Profile* | Compensation Grade |
| level |
Workday will show an alert on three rows asking you to Enter a web service alias that's 16 characters or fewer. These can safely be ignored.
For data use in Talent, worker emails must be unique otherwise the data sync will fail.
6. Scroll down to Group Column Headings and add the following Business Objects:
Business Object | Group Column Heading | Column Heading Override XML Alias |
|---|---|---|
Supervisory Organization |
| supervisoryOrganization |
Worker |
| worker |
Position and Job - All Staffing Models |
| positionAndJob |
Location |
| location |
Job Profile |
| jobProfile |
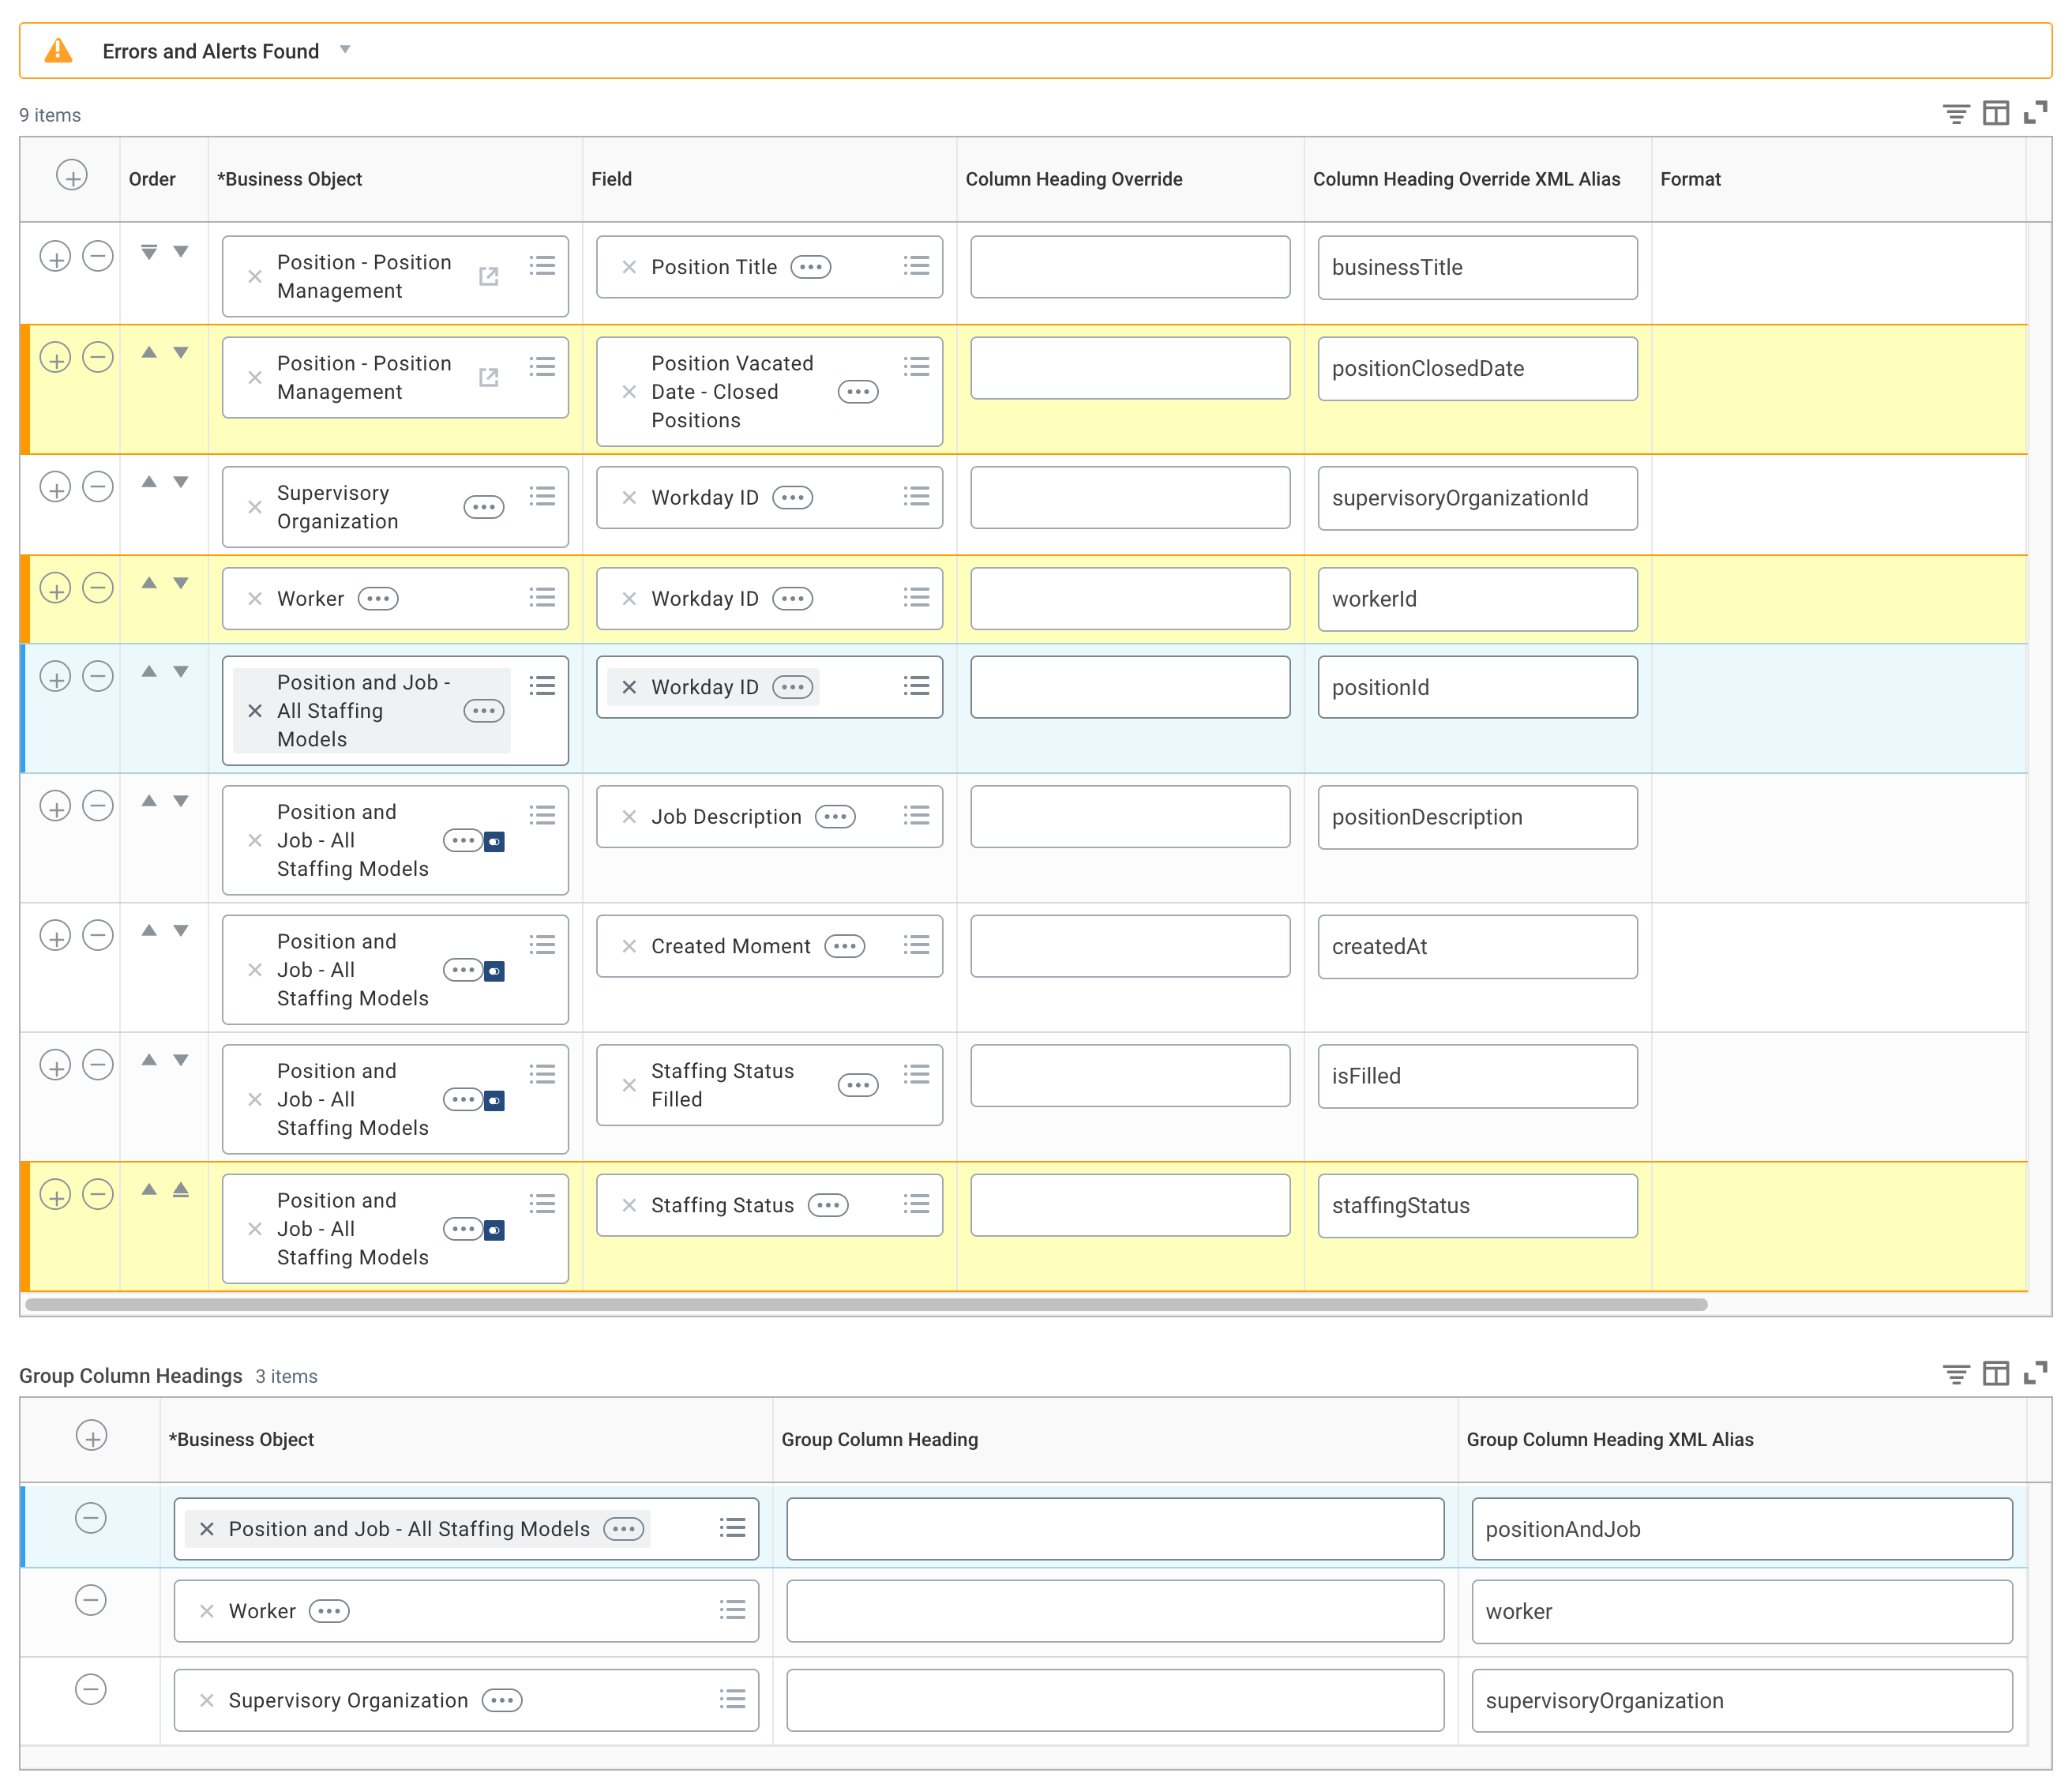
7. Confirm your data looks like this (the order of the rows does not matter):
8. Select the Share tab.
9. For Report Definition Sharing Options, select Share with specific authorized groups and users.
10.For Authorized Groups, add the security group you created above. For Authorized Users, add the ISU account you created.
11.Select OK to save the report.
12.Select Done.
Worker Report
In the Search Bar, once again search for
create custom reportand select the Create Custom Report Task.On the new report, fill in the fields:
Report Name: Can be whatever, but something unique like
Atlassian worker reportReport Type: Set to Advanced
Temporary Report: Unchecked
Enable as a web service: Checked
Optimized for Performance: Unchecked
Data Source: Search and select
All Active Workers and Terminated Workers
When you uncheck Optimized for Performance you’ll see an alert that you can ignore. Select OK.
You’ll be taken to a screen where you can add Additional Info. In the Columns tab, add the following fields. After adding each, you’ll need to select the plus icon at the beginning of the row to add a new row in the table. Be sure to note the Column Heading Overrides XML Alias. These must be entered exactly as below.
Business Object | Workday Field | Column Heading Override | Column Heading Override XML Alias |
|---|---|---|---|
Worker | Workday ID |
| workerId |
Worker | Instance URL |
| workerUrl |
Worker | Email - Primary Work |
| employeeEmailAddresses |
Worker | Create Moment |
| createdAt |
Worker | Name in General Display Format |
| employeeName |
Worker | Time Zone of Location of Worker’s Primary Position |
| localTimeZone |
Worker | Hire Date |
| hireDate |
Worker | Active Status |
| isActive |
Worker | Termination Date |
| terminationDate |
Worker | Last Functionally Updated |
| lastUpdated |
Workday will show an alert for the Email row asking you to Enter a web service alias that's 16 characters or fewer. This can safely be ignored.
5. Confirm your data looks like this (the order of the rows does not matter):
6. Select the Share tab.
7. For Report Definition Sharing Options, select Share with specific authorized groups and users.
8. For Authorized Groups, add the security group you created above. For Authorized Users, add the ISU account you created.
9. Select OK to save the report. You may have to press it twice due to the alert mentioned above.
10.Select Done.
Copy report URLs
The final step in Workday is to copy URLs for each of the reports you set up.
For each of the three reports (Organizations, Positions, Workers)
Open each report (you can use the Search box to find them by name).
Navigate to > Web Service > View URLs
Scroll down to the JSON section, right-click on the JSON link, and select Copy URL.
Do this for each of the three reports and keep the URLs. You’ll need them in just a moment.
Add a Teamwork Graph app and connector from Atlassian Administration
Before you can use data securely from a non-Atlassian app in the Teamwork Graph, you need to add the app and connector from Atlassian Administration.
To add a Teamwork Graph app:
Go to Atlassian Administration.
Select an organization if you have more than one.
In the left-hand menu, expand Apps then Sites.
Select the site you want.
Select Connected apps from the left-hand menu.
From the top-right corner, expand the dropdown to the right of the Explore apps button.
Select Add Teamwork Graph app.
Locate and tick the app you want to connect.
Select Install. This will take you to the Connector screen.
Select Add connector and follow the instructions.
Once you've added the app and connector successfully, it may take 24 hours for your data to be available in your Atlassian site.
Was this helpful?